Blog
Google AMP + WordPress + Automattic = Win

Summary:
“Says AMP-enabled pages will show up higher in search because they load faster”
On February 24, 2016 Google rolled out its Accelerated Mobile Pages, abbreviated AMP, focus on speeding up Mobile pages. AMP provides a new set of web standards that strip away some bloat content on Mobile pages. This allows Google to serve mobile contents with reliable performance. AMP offers fast rendering pages for the price of some restrictions. You can read more about Google AMP here.
Our main focus in this post is to enable Google AMP on your WordPress website and install Google Analytics on these AMP compatible pages so we can adopt to Google’s new mobile changes.
Tasks:
- How to make your WordPress site AMP compatible
- How to customize Automattic’s AMP-WP plugin once installed
- Installing Google Analytics on your AMP compatible pages
- Check for AMP page’s structure data with Google Structured Data Testing Tool
How to make your WordPress site AMP compatible:
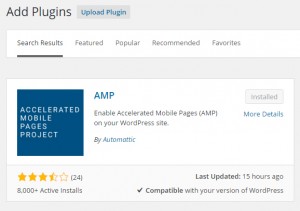
So you have a WordPress website up and running and now you are looking to make it AMP compatible. Its actually really simple thanks to the good folks over at Automattic, there’s a plugin for it. The plugin is named AMP-WP, and you can install AMP-WP through your WordPress’s plugins page by simply search for AMP-WP and install it onto your WordPress website.
AMP-WP also offers a variety of ways to customizing/templating your AMP compatible pages. It is also Jetpack compatible, and if you are a fan of Yaost, like I am, then there’s also a companion plugin for Yoast SEO AMP. I highly recommend installing it along with AMP-WP. Yoast SEO AMP makes sure the AMP plugin uses the proper Yoast SEO metadata. Obviously, you’ll need to have Yoast SEO installed.
How to customize Automattic’s AMP-WP plugin once installed:
As of now, AMP-WP only supports posts (Pages and Archives are not currently supported), but you can tweak it via code. I’ll focus on the basics in this section on styling your AMP page and branding it with your own logo. So if you wish to further customize your AMP pages, then please visit Automattic’s AMP-WP Github page for details.
All coding are placed in your theme’s function.php file.
To custom style your AMP page you’ll need to hook a function on to the amp_post_template_css action, and within the function you can add your custom css. For my site, I simply changed the background and colour of my AMP page’s header section. AMP header icon is default to your WordPress’s site icon and to re-brand it to your own logo, simply upload your logo to WordPress’s site icon section by going to your WordPress admin back-end => Appearance => Customize => Site Identity => Site Icon. Make sure your icon is at least 512px wide and tall. Icon must be square. The title of AMP header uses your WordPress site title which can be changed in your general settings. Please see “Code for Styling AMP Header Bar and Text” for this method.
If you want to hide the site text and just show a logo, then refer to the”Code for Logo Only” section below.
Code for Styling AMP Header Bar and Text
Installing Google Analytics on your AMP compatible pages:
So, now your posts are AMP compatible and the branding of it is to your linking. The next thing is to make sure we can track our SEO progress with Google Analytics. A complete detail on how to Add Analytics to your AMP pages can be found here. For a basic installation, I’ll show you how to below. As per our previous instruction all coding have to be placed in your theme’s function.php file.
First in your Google Analytics account, we’ll need to create a new property for your AMP page tracking. To do so, open your Google Analytics account and go to the site you wish to create new property. Then go to Admin tab and locate Property. Your website’s title should be displayed in a drop down. Click on it and go down to Create new property. Enter your website name (I prefer my site title follow by AMP), URL, category, and time zone. Proceed by clicking Get Tracking ID. This will give you a tracking ID which we will need to insert into our AMP coding. It’ll look something like UA-xxxxxxxx-x.
There are two action we must hook. One is to insert AMP Google Analytics script into the head template section of AMP, and another is to add the actual Google Analytics code into the footer section of AMP. To insert into the header of our AMP template we’ll use amp_post_template_head and for footer amp_post_template_footer.
Here’s the code snippet on adding Google Analytics script to AMP.
Once we have the script in the head, we’ll need to insert the actual tracking code into the footer by adding the following action hook. For simplicity sake, I only show snippet on how to track pageview.
There you have it. Google Analytics on your AMP pages. To test your tracking code, go into your Google Analytics account for the AMP pages and look under “Real-Time” => Overview, with another browser tab navigate to your AMP page, you should see an active user on site.
Check for AMP page’s structure data with Google Structured Data Testing Tool:
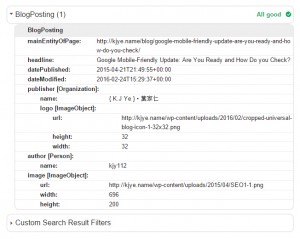
So, we have Google Analytics installed on our AMP pages along with Yoast SEO AMP tools and its working. The next task is to test our AMP pages with Google’s Structure Data Testing Tool to make sure we have everything correct. Simply insert your AMP page’s URL into “Fetch URL” and click “Validate.” If you see a green text of “All good” with a check mark then you are good to go, else fix syntax error by following warning/error messages supplied by the tool. One thing I’ve encounter is that make sure your featured image is at least 696 pixel in width.
That’s all. I hope this post is helpful on getting you started with AMP. If you find this post helpful, please leave a comment below. Thanks and happy AMPing!


