Web Enthusiast - Occasional Blogger - Advocate of Things


GDPR: Email Opt-In Consent With MailChimp & Bloom Lead Generation Plugin

GDPR, MailChim, and Bloom

Disclaimer: Implementing solutions in this blog post alone does not make your site GDPR compliant. Since each site uses different technologies & configurations, please consult with your lawyer and 3rd party technology partners to ensure you have necessary configuration in place.

The Regulation: GDPR

The General Data Protection Regulation (GDPR) (EU) 2016/679 is a regulation in EU law on data protection and privacy for all individuals within the European Union and the European Economic Area. It also addresses the export of personal data outside the EU and EEA. The GDPR aims primarily to give control to citizens and residents over their personal data and to simplify the regulatory environment for international business by unifying the regulation within the EU. GDPR goes into effect on May 25th, 2018 – Wikipedia

GDPR requires email opt-in forms to request explicit consent from users. The way I opted to collect consent is to use a checkbox. The website that I had to implement this on uses MailChimp to collect email list and Elegant Theme’s Bloom email opt-in plugin for their WordPress website opt-in. During implementation, I ran into some issues that prevented the addition of this checkbox.

  1. MailChimp does not have an option to add a checkbox custom field, and the closes to it was a radio button which does us no good.
  2. Bloom’s custom field integration requires a 1 to 1 mapping of input type, which disallowed me to customize MailChimp’s input into a checkbox.

So, in this blog post, I’ll show you how we can easily add a consent checkbox to your MailChimp & Bloom form to make it GDPR compliant.

The Collector: MailChimp

As mentioned above, MailChimp does not have an option to add checkbox as a custom field. So, to add a checkbox as a field to MailChimp that we can map to Bloom we have to create a parent group category. To create a group for your list, please follow these steps.

  1. Go to the MailChimp list that you wish to add GDPR checkbox
  2. Click on settings tab and navigate to “Manage Contacts” and choose “Groups”
  3. Once in “Groups,” you can create a category. I named my group “GDPR Consent”
  4. Under group you’ll see three options. You can remove 2 and label the option with your consent verbiage
  5. Save the new group and this will be added to your list fields

You can also use MailChimp’s default embedded forms and it’ll add a checkbox to it. However, you’ll need to customize it so the checkbox becomes a required field using JavaScript. See next paragraph’s full code example link.

If your list has more than one group, and you do not use Bloom, then you’ll need to customize your embed form to display only “GDPR Consent” group by removing other groups in the generated HTML. You can also use JavaScript to make your group a required field. I am not going to cover these steps here but you can refer to this full code example on how to ensure at least one group is select.

The Front-End Agent: Bloom Email Opt-In & Lead Gen Plugin

Now we have MailChimp figured out, let’s go back to Bloom. First you must go into Bloom’s email accounts tab and refresh your connection with MailChimp list. After that’s done, go into each opt-in forms and in the design option, check “Use custom field” option to yes. Make sure you have the latest version of Bloom version 1.3+. On the drop-down, you should now see your “Group” label “GDPR Consent.” Select it and now you have a checkbox in your Bloom email opt-in form. Below is a full walk through in GIF for this step in Bloom.

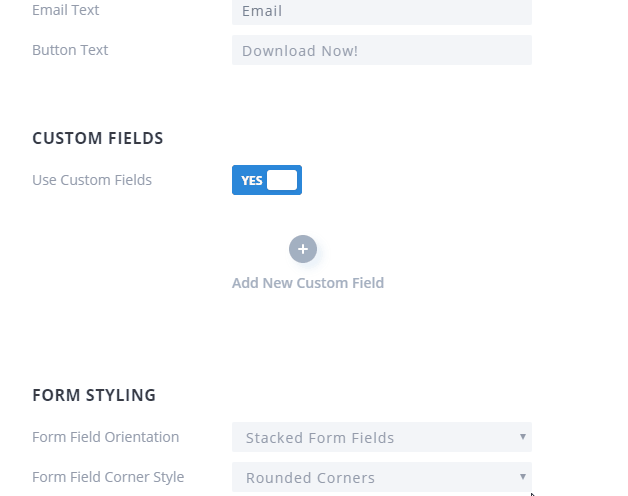
Bonus, if you want to link your privacy policy, then you can click on the link icon under “option” in Bloom’s “Use custom field” and insert your policy’s link & text.

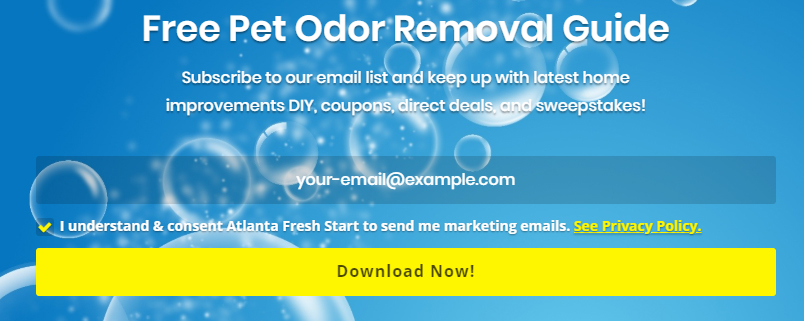
Here’s the final screenshot of the GDPR opt-in email form

Final GDPR Opt-In Email Form

If you find this blog post helpful or if you have questions, please comment below. Don’t forget sharing is caring. Thank you for your time.

(13) comments

SPATARU ALEXANDRU
5 years ago · Reply

This is gold! Thanx a lot.

    KJ Ye
    5 years ago · Reply

    You welcome. Glad you find it useful.

Ena
5 years ago · Reply

I can’t achieve this. I have done everything according to instructions and the custom field is not showing up for me when I try to add it.

The form is connected correctly as it is working and adding subscribers to the list but the custom field is not showing up in Bloom. I am sure I am missing something obvious.Thanks.

    KJ Ye
    5 years ago · Reply

    Hell Ena, thank you for visiting. I’ll try my best here to help you debug, but if you run into additional issues, please shoot me an email. When you are in “Bloom”, under “Design” tab, do you see a section called “Custom Fields?” If yes, once enabled, do you see an orange box with warning text? If you do see the warning text in orange box that means you’ll need to go into your email marketing tool, MailChimp in my case, and add at least one custom field to the list (make sure it isn’t required if you do not need any data mapped to this dummy field). This will allow you to create a custom field in Bloom. If you do not see the “Custom Fields” section in “Bloom,” then you need to make sure your “Bloom” is updated to version 1.3+. Here’s a GIF showing what I am talking about: https://ibb.co/cPgxYK. Hope this solves your issues and best of luck!

    stubble.IO
    5 years ago · Reply

    Hi Ena,

    Re-authorizing MailChimp in the Bloom settings did the trick for us.

lucie
5 years ago · Reply

This is great workaround, thank you! How do I remove the group name from the optin box, as I don’t want to have GDPR consent visible

    KJ Ye
    5 years ago · Reply

    Hi Lucie, thanks for visiting and commenting. You can use CSS and hide it. You can use it on
    .et_bloom .et_bloom_custom_field_options_title {
    }

    Hope this helps.

Ciaran Hyde
5 years ago · Reply

This is really brilliant and thanks so much for it. I was pulling my hair out trying to follow mailchimp’s tutorials. The css given above to hide the name of the group doesn’t seem to be working for me and the group name is still showing.

Ciaran Hyde
5 years ago · Reply

This is really great and thanks so much.

I tried the css to hide the Group name but it didn’t seem to work. I put this in the Bloom css box

.et_bloom .et_bloom_custom_field_options_title {
}

kerstinkruse
5 years ago · Reply

I visited multiple sites but the audio feature for audio
songs existing at this website is truly wonderful.

Darko Novak
4 years ago · Reply

Thanks a ton!

froleprotrem
4 years ago · Reply

I have been examinating out many of your articles and i must say pretty good stuff. I will surely bookmark your website.

Irene
11 months ago · Reply

I was literally getting CRAZY for this stuff. I really cannot say thanks loud enough. I appreciate so much!

Leave a Reply

Your email address will not be published. Required fields are marked *